Saturday, January 29, 2011

Blueberry Cobbler

Blueberry Cobbler
The other day my husband walked in with a bunch of fresh blueberries from Whole Foods.

He said, "when I walked past their display in the window...I simply couldn't resist bringing some home."

~ It's spontaneous decisions like this (and the fact that it's produce...not kittens) that keeps me MADLY in love with this man.~

Anyway, let me say right off of the bat...these photos of this Blueberry Cobbler are not made with those aforementioned berries.  Sigh.

Those...a mere memory.

IMG_8361

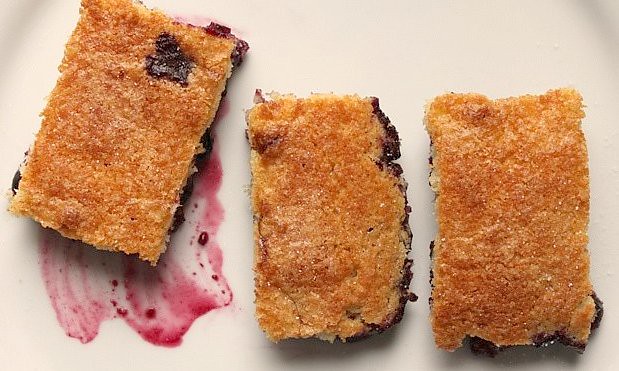
You see when we made this Blueberry Cobbler Recipe the first time (with the fresh blueberries) it was so unbelievably delicious, it lasted no time at all!

There's something about Fresh Blueberry Baked Goods (with fourteen inches of snow on the ground) that demands urgency when it comes to getting your fair share!

IMG_8353

The Blueberry Cobbler was such a hit... I decided to make it again... but using frozen blueberries from Trader Joe's that were occupying space in my freezer.

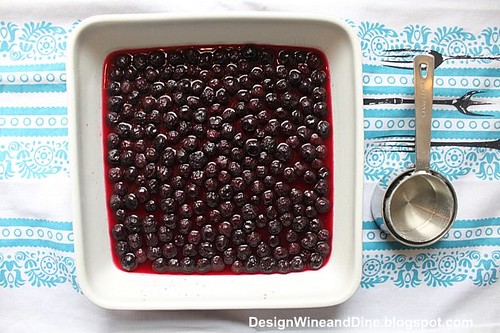
Once the blueberries thawed, I followed the directions exactly...the only difference (albeit a big one) was that the frozen berries yielded two cups (not three cups like the recipe calls for.)

IMG_8372

So while there's no more exciting thing in life than scoring fresh, sweet blueberries in January...

(and it's sad how much that statement stems from the deepest depths of my heart...)

This scaled down...much less expensive version...is also out of this world good!

IMG_8404

(Serving suggestion...Vanilla ICE CREAM!)

Blueberry Cobbler
By: Jen on AllRecipes.com

Ingredients:
3 cups fresh blueberries
3 tablespoons white sugar
1/3 cup orange juice
2/3 cup all-purpose flour
1/4 teaspoon baking powder
1 pinch salt
1/2 cup butter, softened
1/2 cup white sugar
1 egg
1/2 teaspoon vanilla extract

Directions
1.Preheat oven to 375 degrees F (190 degrees C).

2.In an 8 inch square baking dish, mix blueberries, 3 tablespoons sugar, and orange juice. Set aside. In a small bowl, thoroughly mix flour, baking powder, and salt. Set aside.

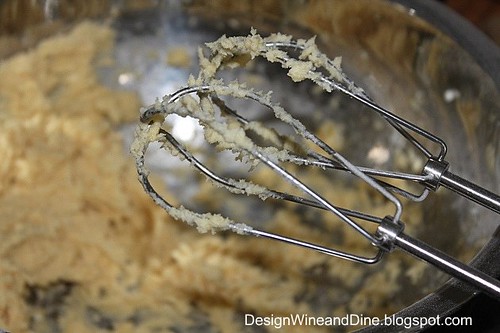
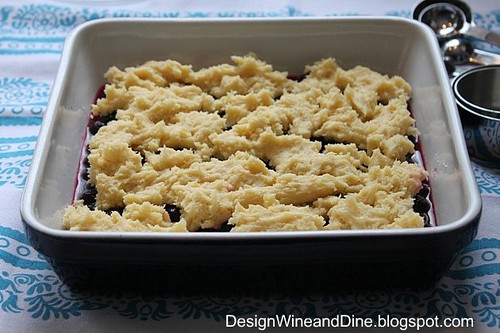
3.In a medium bowl, cream butter and 1/2 cup sugar until light and fluffy. Beat in egg and vanilla extract. Gradually add flour mixture, stirring just until ingredients are combined. Drop batter by rounded tablespoons over blueberry mixture. Try to cover as much of filling as possible.

4.Bake in preheated oven for 35 to 40 minutes, until topping is golden brown and filling is bubbling.

Friday, January 28, 2011

And The Winner Is....

White Truffle Oil

Congratulations...

Sanura at the blog, My Life Runs On Food

Your comment #21 was selected per Random.org! (see below)

Please send your mailing address to designwineanddine@hotmail.com so the LA TOURANGELLE WHITE TRUFFLE OIL can be sent out to you ASAP!

Thanks for everyone who gave it a shot! More GIVEAWAYS coming soon!!!!

Thursday, January 27, 2011

Simple Roasted Almonds ...A Little of This, A Little of That

IMG_7219

My friend Erin has been "begging" I post about these almonds.

She gets frustrated with me because whenever she asks how to make them, inevitably she's met with the same response, "Oh you know...a little of this...a little of that."

I'm not purposely being vague and there's no family recipe I'm desperately trying to conceal...it's just one of those little snacks (a staple in our house) that truly is... "a little of this...a little of that."

So Erin...at the risk of making you furious, low and behold the Roasted Almonds packed with ~ flavor and pizazz ~ "Oh and you know... a little of this...a little of that." ;) XOXO

Simple Roasted Almonds

Raw and Unsalted Almonds (I buy mine at Trader Joe's)
Olive oil or Cooking Spray
Garam Masala
Brown Sugar
Chili Powder
Garlic Powder
Hot Paprika (optional - but we like a little kick)
Sea Salt

Directions:
Preheat oven to 400.

Line roasting pan with foil.

Toss almonds with olive oil or cooking spray until the nuts are well covered but not dripping wet.

Sprinkle on the spices until almonds are well coated (I go in order of ingredients listed above ~ most to least respectively)

Place the almonds in a single layer on prepared roasting pan.

Roast almonds for 8-10 minutes or until the almonds are a nice darkish brown.

Remove from the oven and let cool. (You should hear the almonds make a cracking noise every now and then).

Once cooled the Almonds should be crunchy and packed with delicious flavor.

Store in an airtight container.
Roasted Almonds in a Bowl

Tuesday, January 25, 2011

Baked Turbot with John Besh's Basic Creole Spice Recipe

IMG_8321

A few months ago I was the very lucky recipient of, "My New Orleans, The Cookbook" by John Besh.  Pam from, Pam's Midwest Kitchen Korner hosted the generous giveaway via her blog and upon announcing the winner ~ saw to it the book arrived within days!

Since receiving the cookbook, my husband and I are enjoying learning more about Creole cooking, taking in its stunningly beautiful photography... and perusing all 200 of Besh's favorite recipes!

Besh's connection to New Orleans and its local farms and ingredients is interwoven throughout the book's pages. It's Besh's passion for his city, its people, and those who have shaped his life ...that results in heartwarming stories and sophisticated recipes ~ many of which stem from his childhood.


For my post today, I thought best to begin with Besh's Basic Creole Spice Recipe because (as one might imagine) the mixture appears in so many of his authentic Creole dishes!

IMG_8278

On this particular evening we were short on time, so the Creole Seasoning found its way sprinkled atop a beautiful fillet of turbot.

Layered with lemon slices and baked in the oven uncovered at 375, the 1.4 lb piece of fish was cooked to perfection in 15 minutes!

Served with Baby Spinach and side of Creamy Lemon Dill Sauce...it made a delightful midweek meal!

IMG_8315

If you love Louisiana Creole/Cajun cooking...or simply appreciate cookbooks chock full of proven recipes and expert technique... "My New Orleans, The Cookbook" by John Besh... is a visually breathtaking  page turner that with each recipe challenges you ...to become a better cook.

Here's Besh's Basic Creole Spices recipe as it appears in his book. Just laying the groundwork for many more to come:

Sunday, January 23, 2011

Hummus with Smoked Salmon, Chives and Dill ~ Improvising

IMG_8261

One of my favorite things about homemade hummus (aside from its superior taste to those you buy in the store) is how you can flavor it with just about anything!

What began as an intense desire for bagels, cream cheese and lox...ended with this homemade Hummus with Smoked Salmon, Chives and Dill.

IMG_8233

You see ...with no bagels ...and no cream cheese ...I was forced to think out of the box...

Reminding me again of one of... "Life's Little Lessons..."

"A satisfying life...is all about improvising."

Hummus with Smoked Salmon, Chives and Dill

Ingredients:

2 15oz cans of Chickpeas
4-6 tablespoons lemon juice (depending on taste)
4 tablespoons tahini
3 cloves garlic, crushed (more if you like it garlicky)
4 -5 tablespoons olive oil
2 Tablespoons chives, chopped
2 -3 Tablespoon dill, chopped
Smoked Salmon, chopped (as much a you like)

Directions:

Place chickpeas, lemon juice, tahini, garlic and olive oil in a food processor and pulse to desired consistency. Taste and adjust any ingredient to your preference.

Fold in chives and dill.

Salt and Pepper to taste - careful not to overly salt if you're adding smoked salmon

Top with smoked salmon and serve with crackers, crusty bread or pita chips.

IMG_8241

Friday, January 21, 2011

Roasted Garlic and White Bean Soup with Chicken

IMG_8153

Thank goodness for the Le Creuset in this photo...its glistening cobalt blue porcelain enamel makes the ho-hum appearance of the featured soup...down right appealing!

And after all... this Roasted Garlic and White Bean Soup with Chicken (while not the prettiest on the block) stands for just about everything that is wholesome homemade cooking!

IMG_8084

The soup's story begins with a 6 1/2 lb chicken I roasted for dinner on a Sunday afternoon. The meat we didn't eat was picked off the bone and chopped, yielding 6+ cups of chicken.  The bones from the chicken were simmered down (with the likes of carrot, onion and celery) yielding 20+ cups of stock!

The small white navy beans started out dry ~ they were rinsed, picked over and cooked until soft.

IMG_8099

The bulbs of garlic were roasted with olive oil...into a super concentrated paste.

The rosemary and thyme came direct from the garden.

IMG_8087

So I won't always make soup completely from scratch...

But as the old saying goes..."When life gives you lemons chicken bones, make lemonade a chicken soup."

IMG_8127

Roasted Garlic and White Bean Soup with Chicken
*You could omit the chicken all together and you'd be left w/a delicious Roasted Garlic and White Bean Soup...but I had chicken to use!!!

Ingredients:

1 lb Dry Small White Navy Beans, picked over, rinsed and cooked until soft (or substitute canned beans)
2 cups leftover Roasted Chicken, chopped
4 cups homemade Chicken Stock (or substitute store bought)
2 cups onion, chopped
2 small bulbs or 1 large, Roasted Garlic (squeeze the garlic paste out of its skin)
1 small bunch of fresh thyme sprigs, tied together w/kitchen twine
1 sprig fresh rosemary
1/2 teaspoon Savory
1/4 teaspoon Crushed Red Pepper Flakes (optional)
Salt and Pepper to taste

Directions:

Cook up Navy beans in water until soft...drain.

While beans are cooking, roast 2 hole heads of garlic in the oven. Squeeze out the garlic paste into a small bowl and set aside.

In a large heavy pot with lid, saute onion up in a bit of olive oil.

Add savory, red pepper flakes, rosemary and thyme.

Add cooked beans, garlic paste and chicken stock. Stir together.

Bring to a boil, cover, turn down heat and simmer 20-30 minutes (just make sure your beans are soft and cooked completely)

When finished, remove rosemary sprig and thyme bundle.

At this point you could either add your chicken, stir and eat as is...OR puree soup with an emulsion blender and then add your chicken meat. I did the latter because as some of you know...I'm obsessed with my emulsion blender!!!

Salt and Pepper to taste and be sure to serve with a side of crusty bread!

Wednesday, January 19, 2011

Giveaway ~ LA TOURANGELLE WHITE TRUFFLE OIL

White truffle oil

It's GIVEAWAY TIME and just in time for Valentine's Day!

Here's your chance to win a beautiful tin of the LA TOURANGELLE WHITE TRUFFLE OIL I've been talking up for weeks!

Meant to enhance the flavor of your already fabulous dishes...I've drizzled LA TOURANGELLE WHITE TRUFFLE OIL atop a Creamy Mushroom Risotto, Roasted Brussels Sprouts, Mashed Potatoes and Filet Mignon! 

How wonderful would it be to give your Valentine's Dinner ...that extra special touch!

HERE'S THE DEAL...Anyone can enter and you have up to THREE chances to enter/win (do one...two...or all three!)

One chance: Simply leave a comment below

Two chances: Also follow my blog over on the sidebar and be sure to leave another comment saying you did so (if you already do follow Design Wine and Dine, just write another comment simply saying so to secure another spot and chance at winning!)

Three chances: Also Like the Design Wine and Dine Facebook Page and leave another comment saying you did so (if you already do "like" Design Wine and Dine, just write another comment simply saying so to secure another spot and chance at winning!)

So basically, you're leaving one comment, two comments OR three comments below...each granting you a number (or numbers) that if drawn at random... will make YOU THE WINNER!

I will do a random drawing on Friday, January 28th, announce the winner via my blog and get the White Truffle Oil to you in time for Valentine's Day dinner!  GOOD LUCK!

Monday, January 17, 2011

Classic French Onion Soup ~ Life's Little Lessons

IMG_8039

One of the many things I love about cooking is how it can remind us of life's little lessons.

I've been wanting to make French Onion Soup for months now...

So a few weeks ago I picked up some Gruyere cheese, but didn't have ovenproof bowls...

IMG_8001

A few days later I had the ovenproof bowls, but the Gruyere cheese was gone.

I was beginning to think it just wasn't meant to be...

IMG_8012

Until one day the planets aligned and there I was...

Not only with bowls and Gruyere ...but a beautiful French baguette!

IMG_8016

It reminded me how......"the best things in life are well worth waiting for!"

Don't forget to enter my FREE GIVEAWAY for your chance to win a beautiful tin of LA TOURANGELLE WHITE TRUFFLE OIL! You have until Friday, January 28 to enter and the winner will receive the White Truffle Oil in time for Valentine's Day Dinner!

IMG_8035

Classic French Onion Soup

4 tablespoons, unsalted butter
3 large onions, thinly sliced in rounds
2 tablespoons, AP flour
1/4 cup wine ( I used red but white would work too)
Small bunch of fresh thyme tied together with kitchen twine
4 cups beef broth
2 tablespoons lemon juice
Salt and Pepper to taste (I added 1 tsp of each and it was perfect - but as always - it depends on the salt content of your stock!)
French Bread (plus a peeled garlic clove for brushing over toasted bread, optional)
Gruyere Cheese, grated

Directions:

In a large, heavy stockpot (I LOVE my Le Creuset) melt down butter.

Add your onions and saute over medium heat, stirring often until onions soften and are starting to just brown, about 12-15 minutes.

Sprinkle in flour and mix together with onions.

Add wine and thyme. Cook an additional 1-2 minutes.

Add lemon juice and broth. Bring contents just to a boil then turn down to a simmer, cover the pot and cook an additional 10-12 minutes.

Soup to this point can be made a day ahead. Just remove the tied thyme bunch and let the soup get to room temp. and place in the refrigerator. (Even better when it sits for a day but either way it's fine!)

When you're ready to eat, preheat oven to 375.

Slice the bread to desired thickness (about 1/2-1 inch thick).

Brush the bread with olive oil or butter.

Place bread slices in the oven until just crisping on the sides about 5-8 minutes.

Once out of the oven, lightly brush the top of the bread with a peeled garlic clove just to give the bread a hint of garlic flavor (optional).

Ladle soup into ovenproof soup bowls, top with a piece of toasted garlic bread then top with desired amount of Gruyere cheese.

Place soup bowls in a pan or on a baking sheet to catch any melting cheese from falling into the oven.

Heat prepared soup bowls in the oven for about 8-10 minutes or until cheese is melted and bubbly.

Saturday, January 15, 2011

Argentinian Chimichurri Sauce

IMG_7965

My husband and I have been making Chimichurri Sauce for years now...
incorrectly.

I discovered this last night while developing an Argentinian themed dinner party for our friends.

I began researching the accompaniment we love to serve atop my husband's charcoal grilled skirt steak and while doing so learned, "an authentic chimichurri" simply consists of parsley, garlic, olive oil and lemon (red pepper flakes are also permitted).

No cilantro. No vinegar. No tiny pinch of sugar. (All ingredients I've been guilty of adding in the past. Shhhh.)

IMG_7903

This Chimichurri Sauce recipe I found on-line (based on user reviews) claimed to be, "...about as authentic as it gets."

After you make it once ...I think you'll know why.

Don't forget to enter my FREE GIVEAWAY for your chance to win a beautiful tin of LA TOURANGELLE WHITE TRUFFLE OIL! You have until Friday, January 28 to enter and the winner will receive the White Truffle Oil in time for Valentine's Day Dinner!

Chimichurri Sauce
Bon Appétit, November 1997

3/4 cup finely chopped fresh Italian parsley (from about 1 large bunch)
1/2 cup plus 1 tablespoon olive oil
3 tablespoons fresh lemon juice
2 1/2 tablespoons finely chopped garlic
2 1/2 teaspoons dried crushed red pepper

Preparation:

Place chopped parsley in small metal bowl. Whisk in 1/2 cup olive oil, lemon juice, garlic and crushed red pepper. Season to taste with salt and pepper. Refrigerate at least 4 hours. (Can be made 1 day ahead.) Bring to room temperature before using.

*I doubled the recipe and pureed in a food processor (maybe that ruined the "authenticity" but I was making the chimichurri sauce for a group and desired a pureed consistency.

WARNING: Loaves of bread everywhere should be afraid of this sauce...v.e.r.y. a.f.r.a.i.d.)

Friday, January 14, 2011

Simple Crab Spring Rolls Two Ways

Simple Crab Spring Rolls - Soft

I was craving fried shrimp dumplings...but had no shrimp ...and no dumpling.

I did have 16 oz of Phillips Premium Crab Meat and some Asian Rice Paper I purchased way back when.

Ginger...garlic...scallion...radish...cilantro, ..."a girl and a dream" ...surly all the necessary components to come up with something great.

So I took two pieces of dry rice paper (one dry sheet shown here) and soaked them together in warm water for just a few seconds...

Once pliable, I placed two tablespoons of my crab spring roll filling (recipe follows) and rolled accordingly...

Fold each side in....

When you get to this point, add a piece of cilantro (I neglected to photograph) to the top - and then roll up.

Your Spring Rolls should look something like this below.

At this point ~ the Spring Rolls are delicious and ready to eat ~ they do not need to be cooked.  They're soft, beautiful and perfect to serve at room temperature with your favorite dipping sauce! 

Or you could do what I did...


Fry your Spring Rolls up in 350 degree peanut oil*. Either way...Enjoy!

Simple Crab Spring Rolls -Fried

Simple Crab Spring Roll Filling:

16 oz. Phillips Premium Crab
1/4 cup garlic, very finely diced
1/4 cup fresh ginger, very finely diced
3/4 cup scallion, white and green parts, chopped
3/4 cup radish, finely diced
2 tsp. + Sriracha Sauce

Directions:

Saute the garlic and ginger over medium heat for 3-5 minute until just soft. Remove from pan and cool to room temperature.

Once cooled, mixed all ingredients together.

Voila! A simple, delicious filling for spring rolls, dumplings, wontons...etc!

Whether you eat them fried or not fried...the Spring Rolls can be made ahead of time and either stored in the refrigerator under saran wrap for cold ones...or on a baking sheet and then placed in a 375 degree oven for about 5-10 minutes to reheat until warm.

*Please note...when you fry Rice Paper it does not get hard and crispy like a traditional wonton or dumpling wrapper. Fried Rice Paper gets slightly crisp but still remains soft to the touch. If you're looking for that hard, crisp outer shell, use the same filling recipe above, but roll in wonton or egg roll wrappers instead.

Wednesday, January 12, 2011

Peppers Stuffed with Curried Chickpeas and Quinoa Raisin Salad

IMG_7714

I wake up in the middle of the night and can't fall back asleep.

I think about food...recipes... and those things we can control in our lives -when the goal is staying healthy.

IMG_7693

That's why this year I'm thinking...for every plate of cheeseburgers and fries (because those are going nowhere) ~ there will be a dish like this.

After all...isn't a healthy life all about balance?

IMG_7758

Peppers Stuffed with Curried Chickpeas and Quinoa Raisin Salad

Prepare the Quinoa (keen-wa) Raisin Salad:

2 cups prepared Quinoa (according to your package instructions)
2 tablespoon Pine Nuts, toasted
Handful of Raisins

Add all three ingredients to a bowl, fold together and set aside.

Prepare the Peppers (2-3 large or 4 smaller sized peppers):

Take your peppers and cut off their tops and clean out the insides

Blanch peppers in boiling water for 10-12 minutes or until just soft but still able to stand on their own. Set aside.

Preheat oven to 350.

Prepare Curried Chickpeas:
Recipe adapted from Jolinda Hackett, About.com Guide

1 can Chickpeas, drained and rinsed
1/2 cup vegetable stock (or chicken)
1/2 onion, diced
4 cloves garlic, diced
3 tbsp olive oil
juice from half lemon
1/2 tsp curry powder
scant 1/2 tsp coriander powder
1/2 tsp cumin
1 tsp garam masala
1 large handful baby spinach
Salt and pepper to taste

Preparation:

In a large skillet, saute onions and garlic in olive oil until soft, about 5 minutes.

Add spices and lemon juice and stir for one minute. Add Chickpeas and broth and stir. Cover and simmer about 20 minutes, stirring occasionally, adding more stock (or water) ONLY if needed until chickpeas are cooked and soft.

Reduce heat, add spinach and cover. Allow spinach to wilt for 2-4 minutes.

Mix together the Curried Chickpeas and Quinoa Salad, stuff the peppers with the mixture, place in oven and cook approximately 20 minutes. Broil at the end for an additional 3-5 minutes if desired.

Can be made a day ahead and reheated.

Monday, January 10, 2011

Roasted Brussels Sprout Gratin ~ Part II of PR Champaign

IMG_7594

Maybe it's a New Year thing? Maybe it's that my Mom just read we should all be eating more brussels sprouts...whatever it is... consider this Part II of my PR Campaign for the little green vegetable with the sad and undeserved rap!

IMG_7548

I've completely erased from my mind...that unfortunate event many years ago...and have began approaching the sprouts in the produce section...like I've loved the cabbages forever!

Desperately wishing (while standing there) someone ...ANYONE...would see me and think, "Now there's a woman who seems sure of herself...like she knows her way around a sprout. I think I'll go ask her how she prepares them..."

One of these days I know it will happen...and you better believe... I'll be there ready to talk!

IMG_7611

I go through phases...cookies one week, chickpeas the next...well this week my friends...it's the Brussels Sprout.

Full disclosure...I didn't veer too far off course what I did the first time - loving the flavor combination of the roasted garlic, lemon zest, olive oil and cheese!  This time however... I left out the dough, added toasted pine nuts and turned the roasted medley of brussels sprouts, onions and garlic ~ into a delicious Brussels Sprout Gratin!

Here's what I did...

Roasted Brussels Sprout Gratin

Click Here for the Roasted Brussels Sprouts Steps but stop short of tuning into a pizza and instead...

Add the roasted vegetables to oven proof ramekins or bowls

Stir together well with lots of parmesan cheese (a bit of feta or goat cheese would be wonderful too), toasted pine nuts and touch of lemon zest

Top with more cheese, breadcrumbs (or panko), drizzle with olive oil, cover with foil and cook in a 400 degree oven for 10-15 minutes (or until hot throughout).

Remove the foil and quickly broil just to crisp the top.

Remove from oven and if you have.... drizzle with White Truffle Oil (optional).

Enjoy!
IMG_7606

Sunday, January 9, 2011

Warm Spinach Arugula Salad with Bacon, Eggs and Pecans


On a rare trip out to dinner the other night I made the grueling decision to order the Spinach Arugula Salad. The adjectives on the menu used to describe the salad..."fresh, delicate, earthy"... initially lured me in while the... "Warm Bacon-Shallot Vinaigrette"... completely sealed the deal!

So you can imagine my disappointment when ten minutes later there I sat...in front of a huge bowl of monster spinach leaves with rubbery canned mushrooms, flavorless onions and a barely visible dressing! After much maneuvering of ingredients in search of anything exciting (...a hard boiled egg, parmesan cheese, a toasted pecan perhaps???) all I came across were traces of ...(gulp)...store bought bacon bits!

Dejected...I ended up eating the kid's food while in my head constructing, "the perfect spinach salad."  A few days later I made this...
Warm Spinach and Arugula Salad, adapted from a Rachael Ray recipe

3 tablespoons extra-virgin olive oil
4 slices thick-cut bacon
3 shallots, thinly sliced
2 cloves garlic, chopped
3 tablespoons sherry vinegar
1 pinch of sugar
2 pounds triple washed spinach, stems removed (I used a combination of baby spinach and arugula)
Salt and freshly ground black pepper
Freshly grated nutmeg, to taste
4 hard-boiled eggs, quartered lengthwise (I crumbled my hard boiled eggs)
Parmigiano-Reggiano, for topping
I added a handful of fresh pecans and fresh crumbled mushrooms


Directions:
Cook bacon over a medium-high skillet and brown until crispy. Remove bacon from the pan and pour off most of the bacon grease. Add olive oil, shallots and garlic to the same pan. Cook 3 to 4 minutes then deglaze the pan with vinegar and pinch of sugar. Turn spinach into pan and wilt down a bit but do not fully cook the spinach, just give it a few turns with tongs. Season the greens with salt, pepper and nutmeg. Place spinach on a serving dish and top with eggs, shavings of cheese and reserved bacon, toss and plate. I threw in some fresh pecans and mushrooms too!

Wednesday, January 5, 2011

Roasted Brussels Sprout Pizzas that I dare you not to LOVE!


One night when I was a little girl my Mom made brussels sprouts for dinner.

I was told I wasn't to leave the table until "all those cabbages are gone."

So there I sat...at that table for hours.  I colored... I read... I mastered the Rubik's Cube... but I refused to eat those sprouts!


It wasn't until my parents threatened "no dessert for a month" that I plugged my nose, closed my eyes and ate those brussels sprouts down ~ without even taking a breath!

Ten minutes later (in an I TOLD YOU SO ironic twist of fate) I was sick as a dog!

We never had brussels sprouts again.


Until now.

Right before eating I drizzled just a tiny touch of that aforementioned White Truffle Oil over the top and... well... I'm not bragging BUT these are worthy a spot on the menu at ANY upscale restaurant - they are THAT GOOD!

HERE ARE THE STEPS AND SOME PHOTOS:
*These might look like they're a bit overcooked but the photos don't do them justice! Just keep an eye on them when baking. Take off the outside "charred/crisp" layer of sprout if you would like... 

Preheat oven to 425.  Rinse, trim and cut brussels sprouts in half.

Toss brussels sprouts, pearl onions (you could use regular onion or shallot peeled and quartered) and garlic cloves in olive oil, salt and pepper. Place in roasting pan cut side down and roast for 10 minutes.

Here they are out of the oven. Caramelized, soft yet crunchy with super concentrated flavor!


Store bought Pizza Dough - not gonna lie. Floured and ready to be separated and rolled.


Separate into seven sections then roll into mini circles (about 6 inches in diameter.)


Parcook the pizza dough rounds in a 425 degree oven for 5-6 minutes. Remove from oven.

Take some of the roasted garlic cloves and smash them with a spoon over top of the parcooked dough.

Then top the dough rounds in this order: grated Parmesan Cheese, shredded mozzarella, roasted Brussels sprouts, onions, a bit more cheese and touch of lemon zest. Drizzle with Olive Oil.


Cook in a 425 degree oven until cheese melts - about 5 minutes.

Enjoy hot, warm or at room temperature. If you have it...a tiny touch of truffle oil on top is superb, but they're amazingly delicious on their own! ENJOY!